

Craft Culture is launched in the UK & Ireland on the 1st of July and I am super excited to have the colours for a thorough investigation ahead of time! The first thing to remember is that this is an ‘Fall’ collection (or Autumn as you may prefer to call it). It launches in the summer time so everyone gets the chance to get the colours in, have a play and already be familiar with them by the time our clients start seeking out these Autumnal shades.
This time around there will be opportunity to see and use the colours as well as the Additives from the Craft Culture Collection ahead of the launch date in the UK & Ireland by booking on a Craft Culture Seasonal Trend Class with your local CND™ Educator (locations and times will vary). This is a cool new experience Sweet Squared are offering, if this had been available back in the day I would have camped outside the academy the night before! Haha! You will be able to try before you buy, and take home your designs to show your clients and post on social media to peak their excitement. How cool is that?!
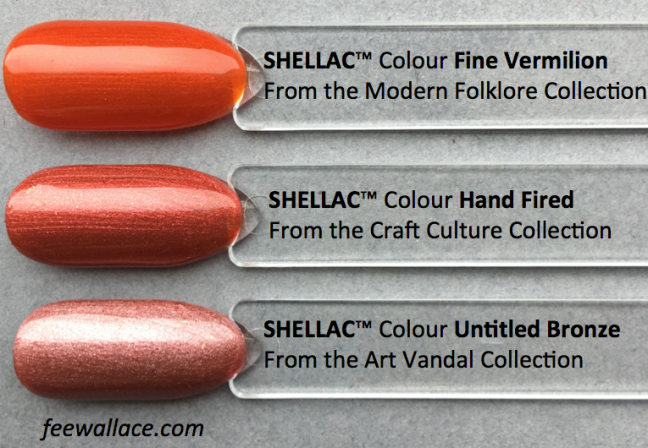
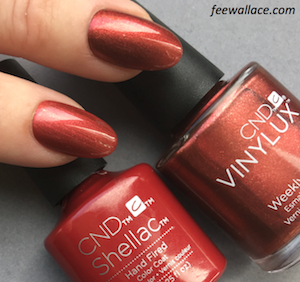 Let’s take a look at the first new colour from the collection, Hand Fired. Available in both VINYLUX and SHELLAC, it’s a richly metallic red-bronze. Don’t be mislead by the wrap on the SHELLAC bottle, the colour it’s self is less red and more bronze than the outside of the bottle. But don’t panic, if you or your client fell in love with the exact colour on the bottle and are now heart broken, all you need to do is layer a thin coat of Decadence over Hand Fired and you get a deeper red version of the colour.
Hand Fired is a sumptuous colour. If I sit and stare into it I can almost smell hardwood smouldering and hear a camp fire cracking. This shade is intensely warm and even the tiny little shimmering micas give off a cosy seeming sparkle.
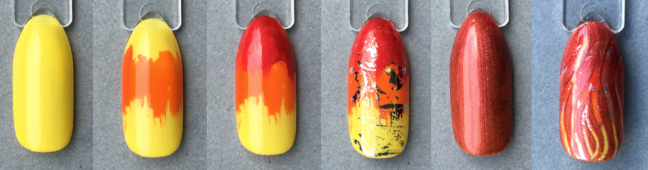
When it came to creating a design I couldn’t NOT make it all about fire. I know it’s a bit cheesy to take the inspiration quite so literally, but the first design I created with this new colour had to be flaming!
 Step 1
After performing PEP and applying SHELLAC Base Coat to the natural nails, or preparing the Nail Enhancement appropriately, apply a layer of Bicycle Yellow and cure in the CND LED Lamp using the 2S button.
Step 2
Apply Electric Orange just to the centre of the nail, then Tartan Punk to the tip and cure.
Step 3
Cure a second time to make the sticky top film that bit stickier, now apply Lecenté Bright Sliver Foil randomly, quite sparsely all over the nail.
Step 4
Apply Clearly Pink all over the nail to seal in the foil and cure.
Step 5
Next, apply a thin layer of Hand Fired all over the nail and allow it to air dry just for a minute or two.
Step 6
Use a dotting tool, or detailer brush if you prefer, to carve through, revealing the colours underneath in a flaming pattern, then cure.
Step 7
Finish with XPRESS5 Top Coat and cure using the 3 button.
If you are a Nail Professional looking for the complete SHELLAC application and removal procedure you can find it here on CND’s website by logging in as a pro.
For CND™ Education in the UK & Ireland go here.

Next up is Denim Patch. Its a gorgeous smokey blue with a creamy softness to it. Absolutely no shimmer or sparkle in this one, so perfect for the crème and matte loving hipster fashionistas, but also perfect as a base for diamanté encrusted, glitter loaded twinkle lovers.
Denim Patch is available in both SHELLAC™ & VINYLUX™ and both incarnations are luscious. You’ll notice the VINYLUX version is ever so slightly warmer in tone when the two are compared side by side in bright daylight, but I did a blind test with my team here in the academy and they could not tell the difference between the two.
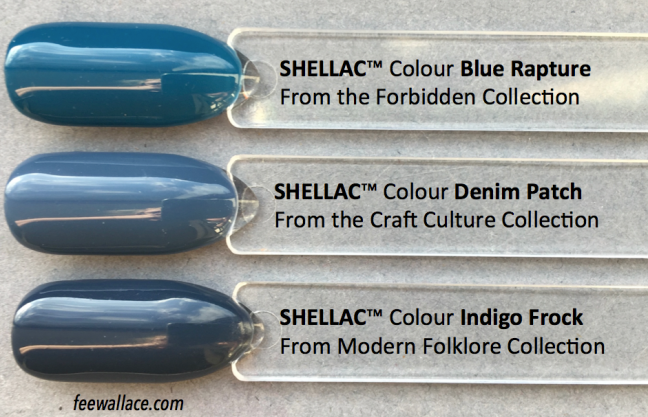
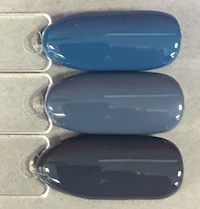 In reality, Denim Patch is much lighter than Indigo Frock and a lot less green/teal than Blue Rapture. This is the kind dusky blue with soft grey tone that we have been missing from the range. For your reference, here are the same 3 colour pops in a different light.
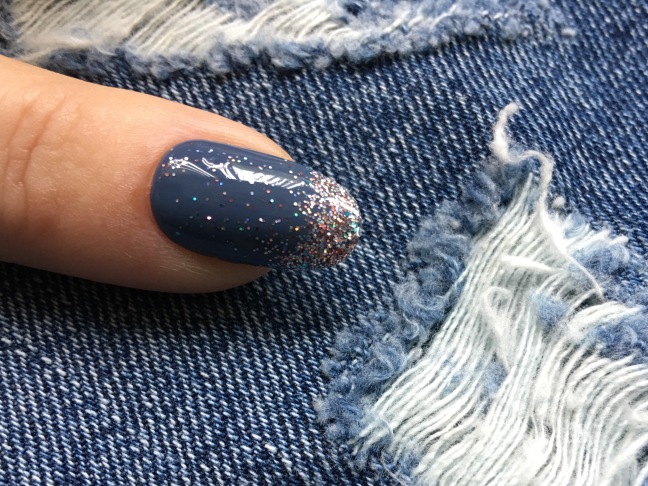
My instinct was to cover this in glitter. My thoughts wandered to memories of diamanté edged denim jackets I wore as a pre-teen, accentuated with neon hair scrunchies and a high pony-tail. Lecenté Goddess Multi-Glitz is the perfect companion to create a wearable nail style from this late 80’s nostalgia. Get your clients to re-live their youth and evoke Madonna’s True Blue era with this nail style!
To create this look is very simple and totally satisfying!
Step 1
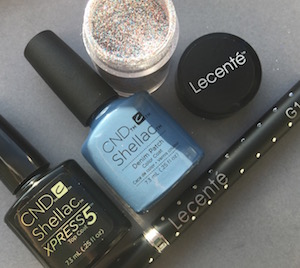
After performing PEP, applying and curing SHELLAC Base Coat on natural nails, or appropriately preparing nail enhancements, apply and cure 2 layers of SHELLAC Denim Patch. Cure each layer in the CND™ LED Lamp using the S2 button.
 Step 2
With a clean dry Lecenté G1 Brush, pick up a little of the Goddess Multi-Glitz Glitter straight from the pot and press on to the extension edge of nail. The glitter will stick beautifully to the top film of the cured SHELLAC colour layer.
Step 3
Give the brush a dust off on a dry pad and proceed to lightly brush some of the glitter down over the rest of the nail to create a fade.
Step 4
Finish with your favourite SHELLAC Top Coat and cure using the 3 button.
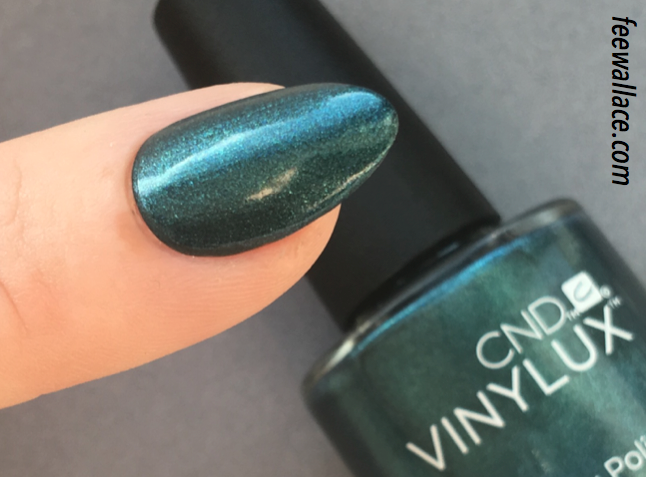
Today’s great revelation is Fern Flannel. As you probably know, my personal favourite coating to wear on my own nails is VINYLUX, so whenever we get a VINYLUX exclusive my heart skips a beat. A lot of my enhancement clients especially wear VINYLUX too and they love getting to feel all hoity-toity about wearing colours that only come in the colour coating of their preference. But never fear, if SHELLAC is your coating of choice and you have SHELLAC clients who are gutted that this colour is not created just for them, you can easily provide a very close replica by applying Jaded Rebel Additive over Water Park SHELLAC.
So what gives with the name? To me and my British cultural background, a ‘flannel’ is something you clean with, either one’s body or pots and pans. Though I am partial to a ‘flannelette’ bed sheet in the winter time (I think the modern term is ‘brushed cotton’ if you want to order some, they are really awesome). But in the US, flannels are shirts. Cosy tartan lumberjack shirts, the kind worm by moustachioed hipster manboys and kindly, gruff old gentleman. I had such a shirt, in yellow that I bought from a skater clothing store in Glasgow that’s no longer there, back when Superdry was a cool, unheard of brand. I adored that shirt, but it was stolen from me at a house party by a wee guy called Fergie who moved away, and I will never forgive him.

Fern Flannels’s closest colour relative is another VINYLUX exclusive, Daring Escape. When VINYLUX first came out Daring Escape was one of the original collection and I wore it to death. When we compare the two side by side we can see that the shimmer and sparkle texture of these two colours is almost identical, but Fern Flannel is a good bit darker and a little warmer too, giving it a sumptuous, velvety texture.
As I type this the sun is beaming down and there is not a cloud in the sky, I’m wearing Fern Flannel on my nails right now and it’s super fine blue mica particles are flashing back at me in a way I hadn’t even noticed until the sun came out. Totally smitten with this colour. Of course dark metallic turquoise-green is not for everyone, particularly not in the summertime, and of course we shouldn’t buy in colours for our clients just because WE like them ourselves… But Fern Flannel is my own colour of the moment and I am utterly unabashed at spending half the morning hand painting nail art on my own nails just for me.
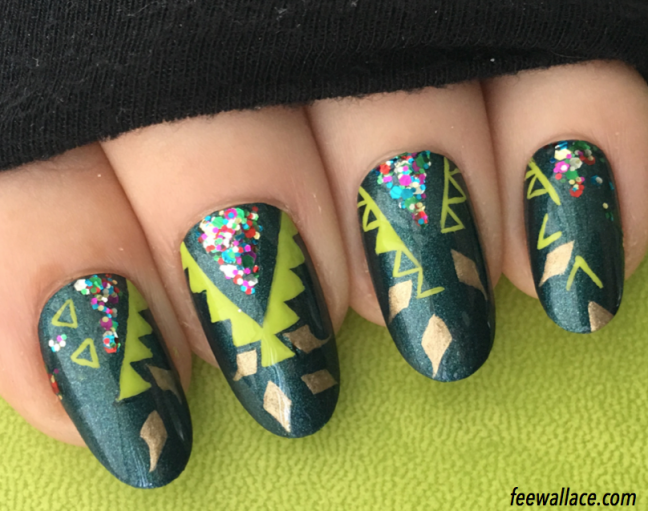
I was lucky enough to visit the Czech Republic last month to introduce CND™ Creative Play to Nail Professionals attending a fantastic pro event held in Moravia. What’s on the middle finger was a design we came up with there while experimenting with Creative Play. I just loved it and it’s been fun creating a nail design story based around it.
Step 1
After performing CND™ PEP, apply two layers of VINYLUX Fern Flannel.
Step 2
With Creative Play TOE THE LIME and a Lecenté D3 Brush, create the little triangles that make up the structural centre of this design.
Step 3
Using Creative Play LET’S GO ANTIQUING, add little golden leaves drifting toward the extension edge of the nail.
Step 4
With Creative Play GLITTERABULOUS using the brush straight out the bottle, ‘dab’ the glitter into place at the cuticle line of each nail. Come in with the Lecenté D3 brush to perfect the points and add smaller clusters of glitter to the outside edges.
Step 5
Allow a few minutes to dry and finish with VINYLUX Top Coat.
 Hints & Tips for hand painting:
- Clean Lecenté Detailer Brushes with CND™ Nourishing Remover, this will effectively remove the polish without damaging the brush hairs.
- Only decant tiny drops of Creative Play colour at a time to hand paint with, larger blobs with start to dry on your pallet as you work and there will be more wastage.
- Clean your brush every time before dipping back into the colour.
- A second VINYLUX Top Coat will help to create a smoother surface.
- On natural nails VINYLUX lasts a week, but over Enhancements it lasts right up to the next rebalance appointment.
- When you finish painting your design you can always go back in with a little of the base/background colour and sharpen up any edges or tidy any imperfections.
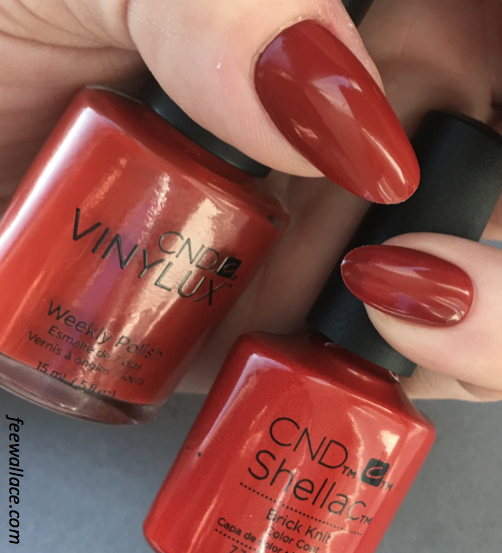
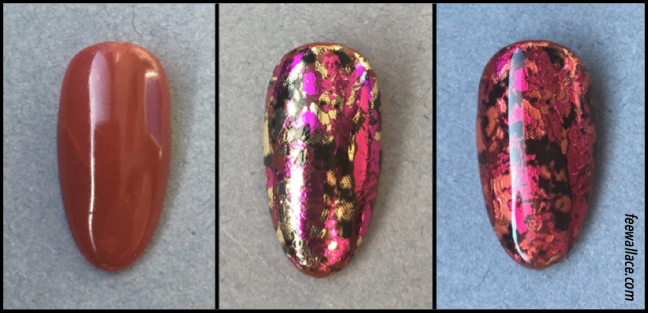
Brick Knit is the fourth colour I’m allowed to share from the new CND™ Craft Culture Collection. In both SHELLAC™ & VINYLUX™ it’s a rich, warm orange-red creme gloss. No shimmer or sparkle at all, this is a creamy true brick red. The VINYLUX version is very opaque even in one layer, whereas the SHELLAC version is slightly glossier, like a deep red-orange stained glass window.
The downside to this level of opacity in the SHELLAC incarnation is that is could be a wee bit see through in two thin layers. This is only a problem if you are applying it over a natural nail with an extremely white natural free edge or over a pink and white nail enhancement. In reality I don’t see this as a downside, in fact, we could do with more colours like this because they are super useful for certain nail art techniques such as the fabled ‘foil sandwich’. Can I just say, I dislike the word sandwich. Don’t get me wrong, I like sandwiches (a lot), but when it comes to nail application techniques, I prefer a loftier, less food related metaphor, so I like to call this technique ‘foil lamination’.
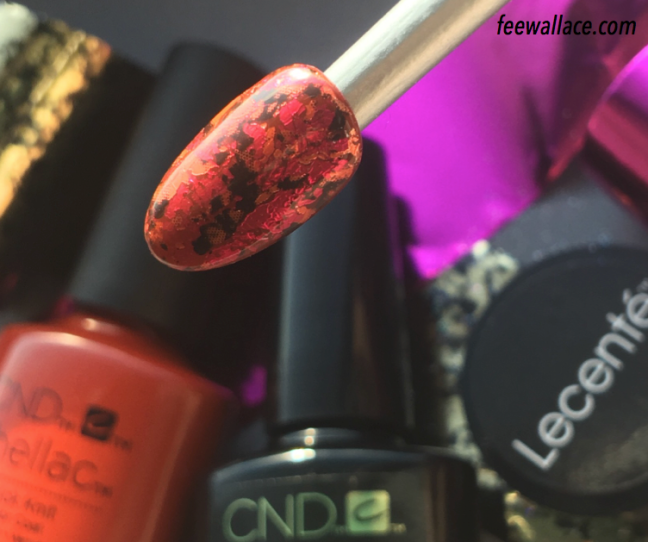
This look is sumptuously multi-dimensional. It’s like a natural rubellite tourmaline gem encased in resin, or a highly polished red amber pendant. Just gorgeous. Expensive looking and packed with wow-factor.This look is simple and quick to create and your clients jaws will drop at the awesome result.
Step 1
After performing PEP, applying and curing SHELLAC Base Coat on natural nails, or appropriately preparing nail enhancements, apply and cure a layer of SHELLAC Brick Knit. Cure in the CND™ LED Lamp using the S2 button.
Step 2
Cure a second time to make the sticky top film just that bit stickier.
Step 3
Press on Lecenté Magenta Foil, and then Lecenté Antique Foil so that the whole nail is covered. (If there are a few gaps it’s no problem)
Step 4
Apply a further thin layer of Brick Knit SHELLAC and cure using the 2S button.
Step 5
Finish with SHELLAC XPRESS5 Top Coat and cure using the 3 button.
Adding in the layer of foil will add 5 minutes max to your service time. I prize fast and impactful nail art techniques above all others. Brick Knit is an excellent choice for foil lamination and I can’t wait to show it off to every one of my clients.
When you say Brick Knit in a Scottish accent it sounds like ‘Bricking It’, which is adorable and hilarious. This makes me love the colour all the more and will give my clients and students a proper a giggle.
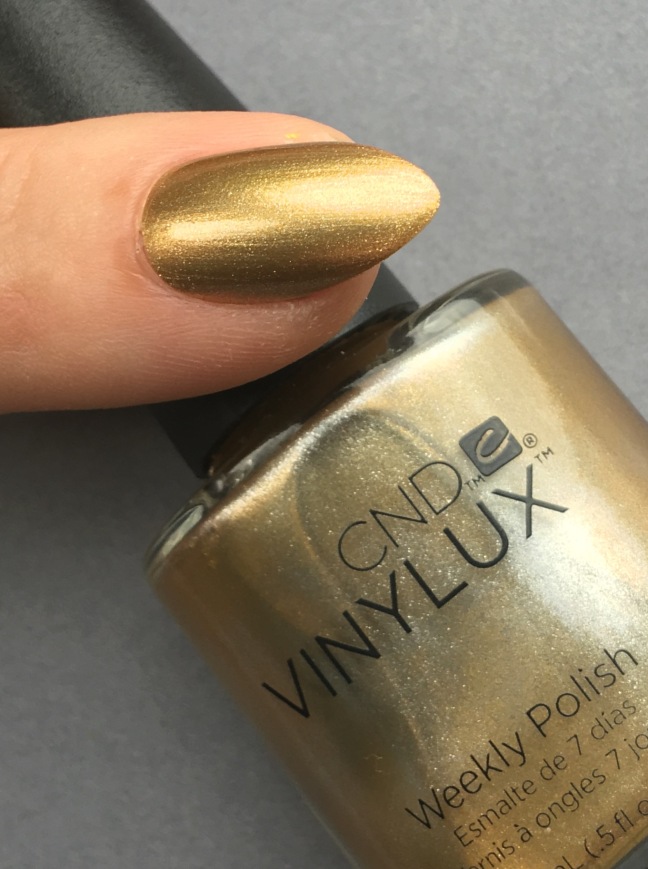
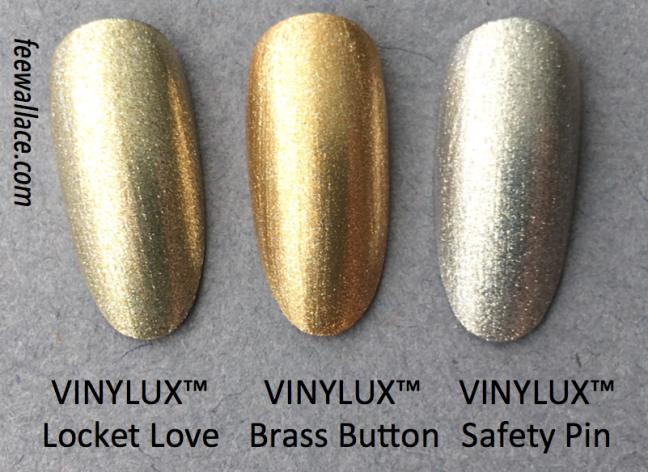
The VINYLUX exclusive, Brass Button is the perfect bright metallic yellow-gold. When it comes to gold nails, clients and nail pros will often favour cooler, more silvery gold shades as they are perceived to be more flattering and less in your face. But sometimes what we need is a gold with real presence. I’m thinking about the wedding parties I’ve done where the ladies would come with their henna mehndi art work on their hands and the most beautiful bright yellow-gold jewelry you might see at a traditional Indian wedding for example. Safety Pin or Locket Love, although completely beautiful in their own right, just don’t have the golden vibrancy needed to compliment this kind of style and palette.
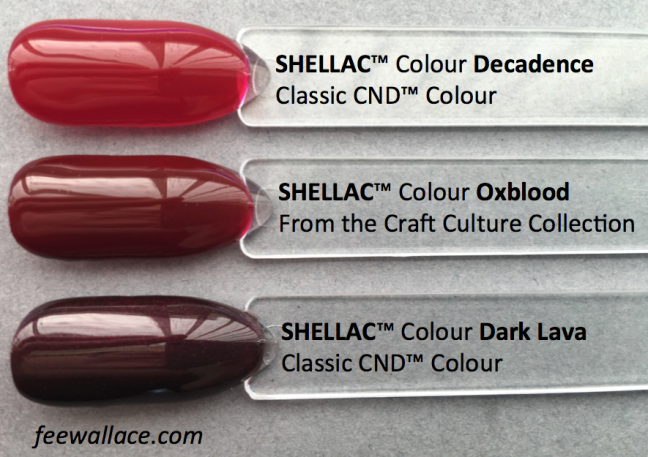
Now let’s kick things up a notch with Oxblood! Available in both SHELLAC and VINYLUX.
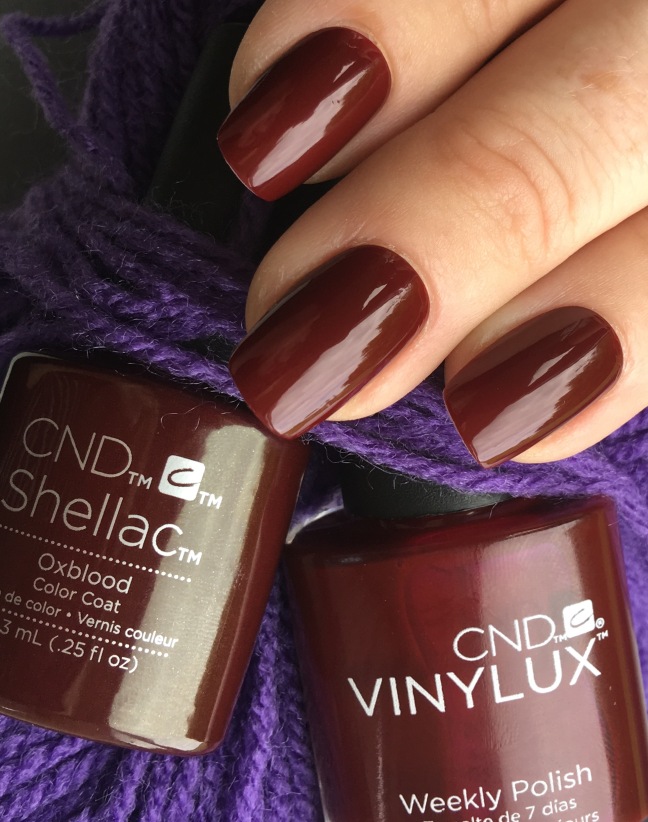
I have to say it. Oxblood is possibly my favourite CND colour of all time. I am bowled over anew every time I look at it. It’s the deepest of deep warm reds, without straying over into purple. (Though as you can see it looks great against purple.) Oxblood is a timeless classic. The goth in me is excitedly jumping for joy behind a veil of dark stylistic misery. The business power bitch in me in admiring her nails while scrunching up a sub-standard report to flick back in someone’s face across a huge desk. A modern Alexis Carrington would wear this colour – the devil wears OXBLOOD! I just can’t get over it.
Let’s be honest, we already have a LOT of reds in the ranges, especially in Vinylux. But it comes back to that same predicament I’m sure you have all experienced…
Client: “Hi, I’d like to get a red nail polish please.”
Me: “Of course, let me show you the 47 reds I carry.”
Client: “Yes, thank you for showing me all these reds you have, I have enjoyed spending the last 90 minutes comparing them… but I mean, don’t you have a more RED red?”
I find red nail colours notoriously difficult to photograph properly. They never look in the picture the way my eyes actually see them. I’ve included two shots here to help illustrate the difference, but still, I think you need to see this one in real life to truly get it’s utter fabulousness!

There is no shimmer at all in Oxblood, and it’s densely opaque even on the first layer, though looks like a glossy liquid. This is going to be the ideal read not just for me, but for several different clients I can think of off the top of my head. Perfect red nails is a look that transcends age, style or background. For every client there will be a day, probably many days, where red is the only colour that will do, and with CND continuing to add to our arsenal of reds, we will be prepared, oh yes we will.
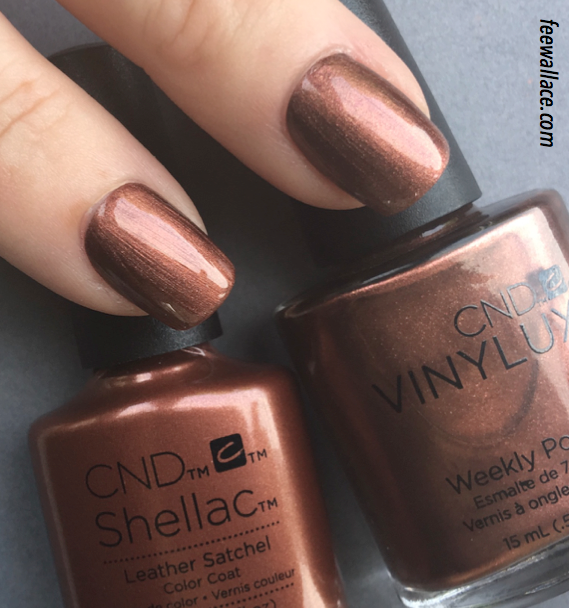
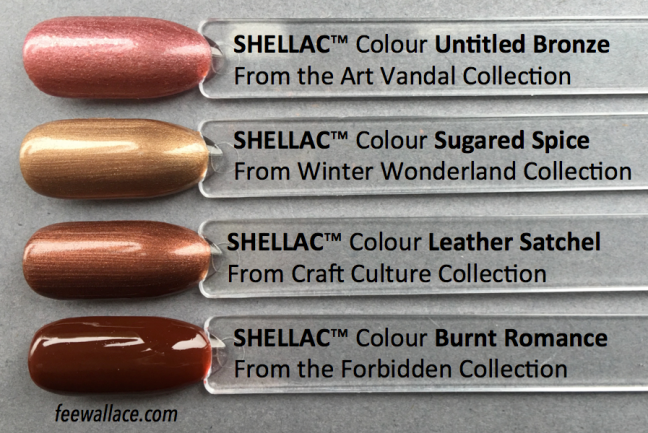
When I look at Leather Satchel, I’m reminded of spilling bronze lipgloss all over my school bag back in the day. This colour is metallic, but the mica particles are extremely fine, so it’s not sparkly as such, it just has this velvety lustour to it. To me, this is a perfect compliment to this range because not everyone suites the super warm, orange-red colours so popular in autumn. Yes Leather Satchel can be described as a bronze, but the shimmer in it cools it down and I’d choose it for clients who like the look of a bronze from a fashion point of view, but for whom orange based colours look like hell next to the skin.
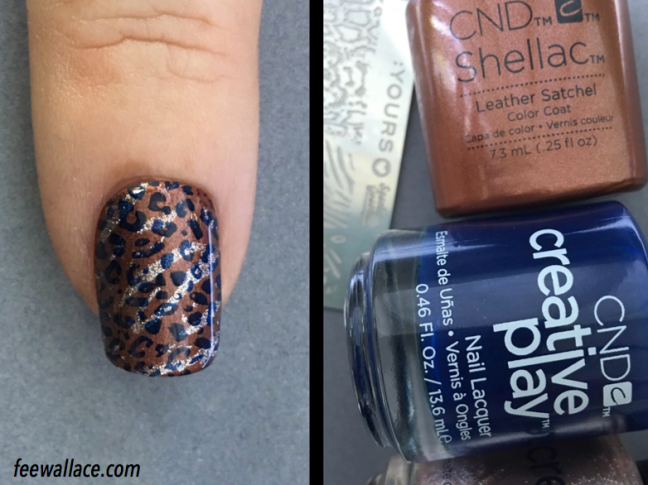
Leather Satchel cried out to me to be stamped with animal print.
Step 1
After performing PEP, applying and curing SHELLAC Base Coat on natural nails, or appropriately preparing nail enhancements, apply and cure a layer of SHELLAC Leather Satchel. Cure in the CND™ LED Lamp using the S2 button.
Step 2
Stamp using Creative Play TAKE THE $$$ using the Yours Plate Wild Skin straight onto the sticky top film of the cured SHELLAC Leather Satchel colour layer.
Step 3
Stamp again using the same plate with a different pattern, this time with Creative Play NAVY BRAT.
Step 4
Finish with XPRESS5 Top Coat and cure using the 3 button.
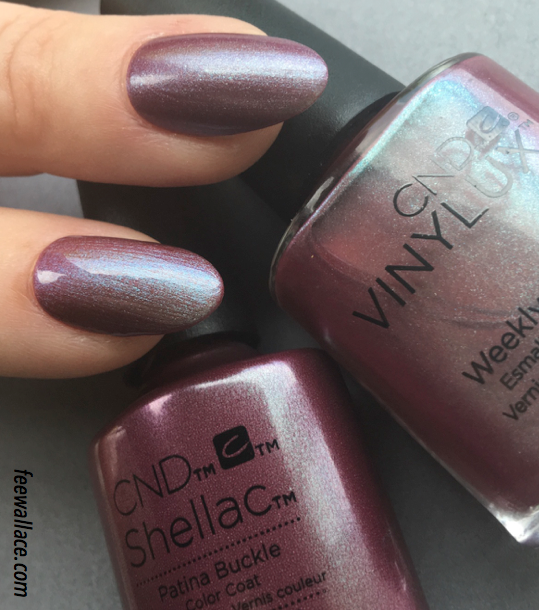
Oh Patina Buckle, you beautiful, strange and unusual colour! This shade is hard to define.
Q: Is it purple?
A: Mmm, kind of?
Q: Is it green?
A: Well, from some angles yes!
Q: Is it brown?
A: A wee bit, in certain lights.
So far this is the best definition I’ve come up with:
“Patina Buckle is a minky/mauve-purple, with a mint-turquoise frosting, that changes depending on what angle and in what light one looks at it.”
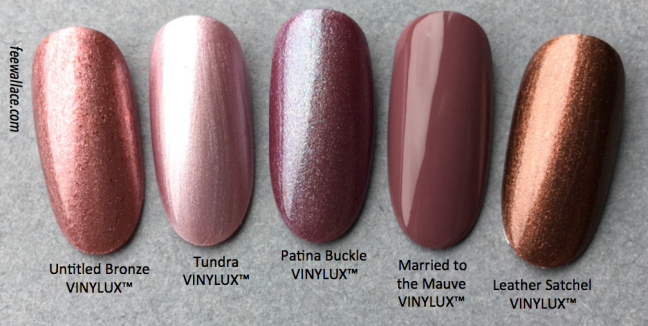
It might seem as if my colour comparison choices are quite far off, but really, there is nothing even close to this colour in the whole range. When it came to Vinylux, I used a few different colours just to give some chromatic context.
Patina Buckle, another unusual name! I had to look it up, and it turns out it’s the most apt name this colour could possibly have. I love the colour, I love the word. If I am ever blessed with a daughter ‘Patina’ is legit on my shortlist of names.
It’s been a while since we got a SHELLAC colour like this. Patina Buckle is perfect for layering and so far it looks immense over everything I’ve tried it with.
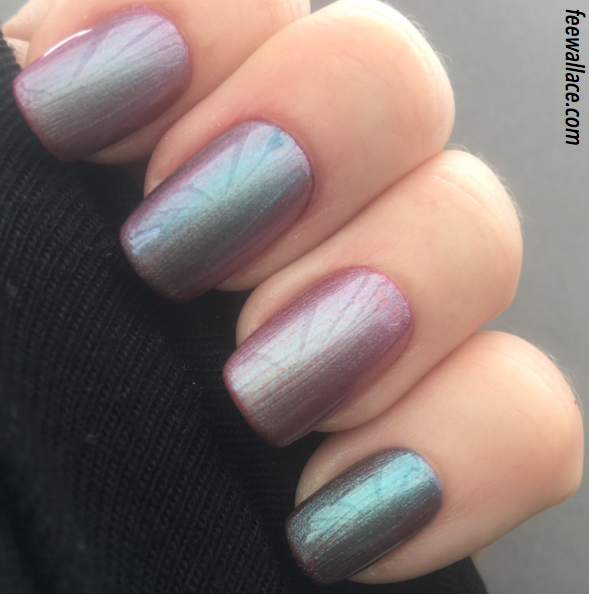
The first layering combos I tried were over other Craft Culture SHELLAC Colours. In the picture above we have:
- Pinky – 2 layers of Denim Patch with 1 layer of Patina Buckle
- Ring Finger – 2 layers of Hand Fired with 1 layer of Patina Buckle
- Middle – 1 layer of Oxblood with 1 layer of Patina Buckle
- Index – 2 layers of Brick Knit with 1 layer of Patina Buckle

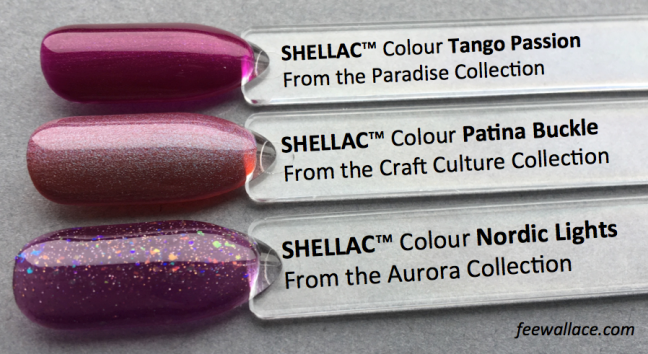
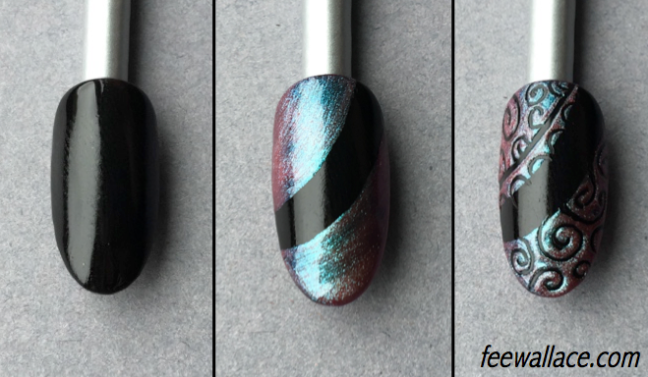
Any SHELLAC colour that layers well such as Hot Chillies, Tango Passion, Tundra and now Patina Buckle, is also a perfect choice for ‘de-bossing’ or carving.
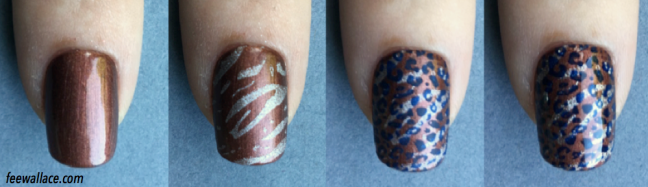
Step 1
After performing PEP, applying and curing SHELLAC Base Coat on natural nails, or appropriately preparing nail enhancements, apply and cure a layer of SHELLAC Black Pool. Cure in the CND™ LED Lamp using the S2 button.
Step 2
Apply Patina Buckle SHELLAC to the top right and bottom left corners of the nail and allow a minute or two to air dry. This will make the next step go smoothly.
Step3
Using a fine dotting tool or stylus, carve a swirling pattern into the un-cured Patina Buckle. Clean your dotting tool with IPA every time you lift it off the nail. When you finish carving your design, cure using the 2S button.
Step4
Finish with the SHELLAC Top Coat of your choice.
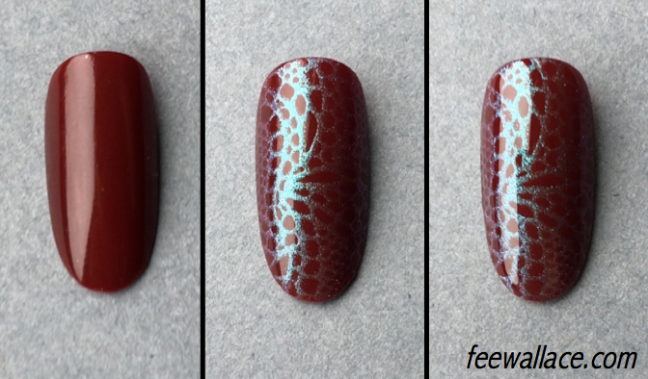
When you stamp with Patina Buckle you’ll see what a beautiful shimmering sheen it gives the pattern. Ideal for multi-layered stamping over all kinds of colours.
Thanks for checking out the blog! Let me know your thoughts here in the comments section or over on Facebook.
This has been a long read! Thank you dear reader for taking the time. I hope you have found the content interesting and that you are feeling excited about this new collection.
Fee x

I’m looking forward to seeing the rest of the Autumn collection. The seasonal trend classes are a fab idea, I can’t wait to hear more about them.
LikeLike
This looks amazing, Fee, can’t wait to see the rest of the colours. The shimmery pinky/lilac colour looks interesting, looking forward to seeing what you do with it!
LikeLike
Hello! I’m trying to find a and shellac polish to compare to OPI sky fall. Do you think rouge rite or oxblood would be a better dupe? Thank you !
LikeLike